Showing posts with label Blogging Tips. Show all posts

Top 10 best SEO research tools you must know

 
Are you want to increase your site traffic and get appropriate keywords suitable for your site.Here the top 10 research tools for you.

 
Top 10 list : 
* Google Adword
* Google Tenders 
* Google Sktool 
* Keywordspy tool
* SEO book tools

How to add RSS and Social icon in your blog

How to add RSS and Social icons to your blog|site  This widget is very important for every blogger. This widget help to share your post in social bookmarking sites and given Rss update for your visitor. I think you need this widget. So don't be late. Let's see how to add RSS and Social icon in your blog site.

Steps  :
1  : Go Layout and Click Add Gadget.
2 Steps : Now Find HTML Widget.
3 Steps : When you complete Steps 1 or 2 then copy those codes and paste all codes in HTML widget.


<a href="http://www.facebook.com/pages/A-Light-Tips/263733120330145" imageanchor="1" style="margin-left: 1em; margin-right: 1em;"><img border="0" src="https://blogger.googleusercontent.com/img/b/R29vZ2xl/AVvXsEg2N710l4FZAixhVLVtD2jJsIhR3mjIo1A-puDXa-rI3l85C-UgzX_J4J9A4PQlr3WO9eKvzSk-jk7SFN3StoRXcMP1kYipSXt3dgEVBgnKh_B7vQmAj0j8wxawSI8f1rnfTZaapaAW2VE/s1600/facebook-30x43.png" /></a><a href="http://twitter.com/LightTips" imageanchor="1" style="margin-left: 1em; margin-right: 1em;"><img border="0" src="https://blogger.googleusercontent.com/img/b/R29vZ2xl/AVvXsEg_lUhuxYn4Q3NkdoBnuvA3xKI4FYQRFlvgiQvCc1sNTUCWYeq_9OtarVRcKbRYWL1i0lg94loMldPjAqL5t51zkfxFGx19twH6lqQka2Z4wSB0SBjtioKH3rBLJqpWlLvwGfsKuIwbdzg/s1600/twitter-30x43.png" /></a><a href="https://plus.google.com/u/0/115563475045617121037" imageanchor="1" style="margin-left: 1em; margin-right: 1em;"><img border="0" src="https://blogger.googleusercontent.com/img/b/R29vZ2xl/AVvXsEg1e82Cj8H6RC1VNMLXrwCr_bS0PaIaIsr6_YLYXDhJkgQawZAMAoKygwOSqF9LrRH7WnwogRVRSeoPuiDwX61h4Dmvqoi3Q9gAVmuxkh0hW3LNVxBjBaMBBRYYutHT7Nfa1eE3TkAcsek/s1600/googleplus-30x43.png" /></a><a href="http://feeds.feedburner.com/lighttips" imageanchor="1" style="margin-left: 1em; margin-right: 1em;"><img border="0" src="https://blogger.googleusercontent.com/img/b/R29vZ2xl/AVvXsEhTy5BFYsCSUvilEfpZaFTOB5nBpnU4CNOdppeyYntDsaGrSzzAt2N3XFa4TTB5BMVaNFi4zZLxDAtUa2Zar1rR-UIhxc8hpDDP5p1huEWcLubuqFvFIoLVcPmnEfCBXqJtzjUPhezw940/s1600/rss-30x43.png" /></a>
Note:Change your own follow the blue codes.

Please share and drop your comments and question below.

How to get more Traffic to your Blog or website

How to get more Traffic to your Blogger|Website  Getting traffic is one of the most important tasks for any web master. What is more, you can't get traffic once and then just reap the benefits. One of the most successful way is linking with Traffic Exchange sites.Below shown the top traffic Exchange sites.

Traffic Exchange Sites

A number of traffic exchange sites have blog directories which can include links to your blog.
Blog Directories

Technorati Technorati

They supposedly track 75.2 million blogs. Quite naturally, you would want your blog to be one of them. Register with them and submit your blog. Follow their instructions to claim your blog. They will provide you with statistics like the number of blogs that link to you. You can also invite other members to favorite your blog.

How to add meta description and keyword in blog

How to add meta description and keywords in blog|website meta description and meta keywords are most important for search engine optimization. 
. When you make your meta description and keyword list then you may follow this steps which is given below.

 
How to add meta description and keyword in blogger blog:. 

#1 : Login BloggerDeshboard>Template>Edit HTML>Proceed.
#2 : Check Expand Widget Template. 
#3 : Find this code <meta content= and paste your description here (replace this). look after your description wrote name='xxxxxxxxx' (replace this)


<meta content='http://askblogexpert.blogspot.com this site given a lot of information in blogging tips, computer tips, blogger gadgets, internet, SEO help, Adsense help, Software updet, windows tips and trikes etc. Here all article makes with image and video tutorial.' name='description'/>
#4: Now paste <meta content= your keyword here and change name='xxxxxx'
<meta content='blogging tips, computer tips, HTML tips, SEO, Adsense, Software Update, Windows tips, video tutorial' name='keywords'/></b:if>
 I hope people you enjoyed this article.TO get more SEO tips stay connected with us
   Note:Meta description and keywords are most important.If you want to improve your site  placing the top  position in google pages ask me in commennt section.

How to Create Related post link in your each post below

How to create Related post link below the every post in blogger or website Today i will share how to Create Related post link each post because lot of people asking me to give a tutorial on how to create Realted post below.
  Login your dashboard Template and click Edit HTML
Now you will be Redirected into this page: 

Click Proceed and Check Expand Widget Template. Now press Ctrl+F3 to Find  <data:post.body/> this code. When find that code in your template editor copy those code given below.

<!--related post started-->
<b:if cond='data:blog.pageType == &quot;item&quot;'>
<div class='similiar'>
<div class='widget-content'>
<h2>Related post</h2>
<div id='data2007'/><br/><br/>
<script type='text/javascript'>
var homeUrl3 = &quot;<data:blog.homepageUrl/>&quot;;

var maxNumberOfPostsPerLabel = 5;
var maxNumberOfLabels = 3;
maxNumberOfPostsPerLabel = 5;
maxNumberOfLabels = 3;

function listEntries10(json) {
var ul = document.createElement(&#39;ul&#39;);
var maxPosts = (json.feed.entry.length &lt;= maxNumberOfPostsPerLabel) ?
json.feed.entry.length : maxNumberOfPostsPerLabel;
for (var i = 0; i &lt; maxPosts; i++) {
var entry = json.feed.entry[i];
var alturl;
for (var k = 0; k &lt; entry.link.length; k++) {
if (entry.link[k].rel == &#39;alternate&#39;) {
alturl = entry.link[k].href;
break;
}
}
var li = document.createElement(&#39;li&#39;);
var a = document.createElement(&#39;a&#39;);
a.href = alturl;
if(a.href!=location.href) {
var txt = document.createTextNode(entry.title.$t);
a.appendChild(txt);
li.appendChild(a);
ul.appendChild(li);
}
}
<!--Bloggertrix.com-->
for (var l = 0; l &lt; json.feed.link.length; l++) {
if (json.feed.link[l].rel == &#39;alternate&#39;) {
var raw = json.feed.link[l].href;
var label = raw.substr(homeUrl3.length+13);
var k;
for (k=0; k&lt;20; k++) label = label.replace(&quot;%20&quot;, &quot; &quot;);
var txt = document.createTextNode(label);
var h = document.createElement(&#39;b&#39;);
h.appendChild(txt);
var div1 = document.createElement(&#39;div&#39;);
div1.appendChild(h);
div1.appendChild(ul);
document.getElementById(&#39;data2007&#39;).appendChild(div1);
}
}
}
function search10(query, label) {
var script = document.createElement(&#39;script&#39;);
script.setAttribute(&#39;src&#39;, query + &#39;feeds/posts/default/-/&#39;
+ label +
&#39;?alt=json-in-script&amp;callback=listEntries10&#39;);
script.setAttribute(&#39;type&#39;, &#39;text/javascript&#39;);
document.documentElement.firstChild.appendChild(script);
}
var labelArray = new Array();
var numLabel = 0;
<b:loop values='data:posts' var='post'>
<b:loop values='data:post.labels' var='label'>
textLabel = &quot;<data:label.name/>&quot;;
var test = 0;
for (var i = 0; i &lt; labelArray.length; i++)
if (labelArray[i] == textLabel) test = 1;
if (test == 0) {
labelArray.push(textLabel);
var maxLabels = (labelArray.length &lt;= maxNumberOfLabels) ?
labelArray.length : maxNumberOfLabels;
if (numLabel &lt; maxLabels) {
search10(homeUrl3, textLabel);
numLabel++;
}
}
</b:loop>
</b:loop>
</script>
</div>
</div>
</b:if>

<!--related post end-->

and past after  <data:post.body/> this tag line and save your template.
If you face any problem ask me in the comment section.
 

How to add Twitter Button to Blogger

How to add Twitter Button to Blogger|website

  1. First Go to Twitter Button Page
  2. There you will see a Form for you. Fill it with Required data!
  3. on right side, Copy the Widget Code
 .Then,
 In Blogger SideBar:
  • Login to Blogger Dashboard > Design Tab > Page Elements
  • click Add a Gadget on Sidebar
  • Choose HTML/JavaScript, Paste the Copied code and Save it!
 Add on Blogger Posts:
  • Login to Blogger Dashboard > Design Tab > Edit HTML
  • Click on Expand Template Widgets checkbox
  • Find for <data:post.body/> tag
  • Paste the Coppied Code Before or After it! and Save your Template.
then a box shown as follow@admin appear.

Do you like this Article. "Share our posts and also Subscribe by Email" for more tutorials.


How to add Facebook plugin and Facebook like button to Blogger|Website

How to add Facebook Social Plugin|Facebook like button to Website|Blogger

The most important step that a blogger needs to take is to have a social platform for his/her blog,
So here are some simple steps that you need to follow in order to have your page linked to your blog

1. First of all create a page on Facebook. Actually this is quite simple as you just need to click on the option that suits your need.
  •  . Now once you are on the home page, look for the option “Promote this page on your website“. After clicking on it, you will get the 4th option on the page, which looks like this

 . Once you get here, replace your page URL with your facebook page URL You can customize the plugin as per you needs. Now a box would display. Click on the IFRAME and copy the code.
  •  After that log into your blogger’s account and get onto the Layout .
    Now, you need to click on Add a gadget option.
 
  •  . Finally click on the option HTML/JavaScript. After that paste the copied code and save it. and here we go facebook plugin button added to your website|Blogger.
  • I hope you find all about how to add facebook social plugin to your blog. Share,Like and Subscribe by Email and get the more tutorials. 

How to Backup your Blogger Template

How to Backup my Blgger template Planning on editing your Blogger (Blogspot) template? Make sure you backup your Blogger template first! Here's why: If you run into any problems with your edits, you can simply revert your template back to its previous condition by restoring it from your backup.

Fortunately Blogger makes it very easy to backup your template. This article shows you just how easy it is!

How to Backup your Blogger Template:

  1. In your Blogger dashboard, click on "Template" in the left menu.
  2. Click on the "Backup/Restore" button in the top right corner.
  3. Click on the "Download Full Template" button.


  4. Choose where you want to save the file on your computer and then click the "Save" button.
Now you can proceed with editing your Blogger template If you run into problems - just revert back to your saved template.

How to Restore your Blogger Template:

  1. In your Blogger dashboard, click on "Template" in the left menu.
  2. Click on the "Backup/Restore" button in the top right corner.
  3. Click on the "Browse" button. Then navigate to and select your backup file on your computer. (It will be an .xml file)
  4. Click the "Upload" button.

How to add meta tags description tags to my Blogger

How to add meta tags description tags to my blogger

How to add Meta Description Tags

Blogger has rolled out an array of SEO features and now adding Meta Tags has become so easy. You can do it easily from the Blogger’s User Interface without doing much of Template Editing or pulling your hair. So here is how to do it


  1. Go to Settings > Search Settings and Enable Meta Tags. In the Text area give a 150 character description which will describe your Blog. This text might be used by Search engines when your Blog’s home page is displayed on Search Engines. Here is the snippet that I have given “Blogger Widgets provides you the best quality blogger tutorials.It also provides you with free blogger widgets and  gadgets to build a better blog.”         Now when you make a Post, you can set the Meta Description from the Post Editor’s Post Settings  Sidebar.  


  • You can always edit the Search Description for existing posts as well
  • If you are having a custom template, make sure that the following line of code is present in your template. To do that go to Template and Proceed to Edit HTML . Find
    <b:include data='blog' name='all-head-content'/>
    If it's not present, add it just before </head>
  • That's It you have done it.


  •      IF you have any problems post comments below.
  • Whats new in new blogger interface| know about new blogger

    Whats new in new blogger


    Create a blog

    To start a blog with Blogger, visit the Blogger homepage, enter your username and password, and click Sign in. Enter a display name and accept Blogger's Terms of Service. Then click the Create a Blog link and get started!
    Pick an address (URL) and a blog title. Then, choose your favorite blog template (this is how your blog will look when you publish it). Now get creative, add information to your personal profile, and customize how your blog looks, if you feel up to it. Start blogging now!

    Dashboard


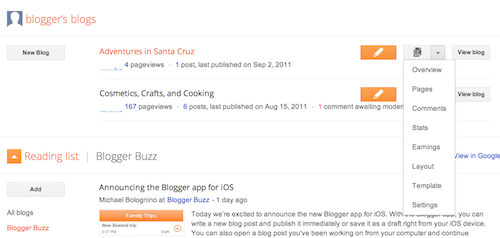
    Your Dashboard, as always, is your starting point. This is where all your blogs are listed, and you can click on the icons next to them to perform various actions on each blog, such as:
    • Writing a new post: Just click on the orange Pencil icon on your Dashboard to access the Post Editor.
    • Viewing your posts: The gray Post List icon will take you to a list of your published and drafted posts for a specific blog.
    • Catching up on your favorite blogs: Below the list of your own blogs, you’ll see a list of the blogs you follow with an excerpt from their latest posts.
    • Everything else: Check out the drop-down menu next to the Post List icon for a quick link to:
      • Overview
      • Posts
      • Pages
      • Comments
      • Stats
      • Earnings
      • Layout
      • Template
      • Settings

      Overview


        you can customize your blog's design using our intuitive drag-and-drop interface. You can also add powerful gadgets such as slideshows, user polls, or even AdSense ads. If you want more precise control over your blog's layout, you can also use the Edit HTML feature. To edit your blog's layout, follow these steps:


      Dashboard
    1. Click Layout from the drop-down menu on your dashboard below the blog you would like to customize.
    2. From there, click Edit to edit existing gadgets, or Add a Gadget to add new ones.
    3. To add a new gadget after you've clicked Add a Gadget, simply click the plus sign next to your desired gadget. You can choose from gadgets by category, or search for a specific gadget in the top right of the pop-up window.

    Privacy and permissions

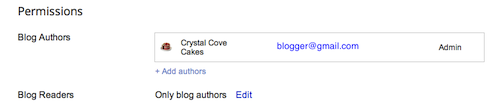
    By default, your blog is completely public, and can be read by anyone on the internet. However, if you want to keep it private, you can do that, too. You can change these settings on the Settings | Basic tab.

    Permissions and Privacy

    1. Under the 'Blog Readers' section, you'll probably see 'Anybody' selected as the default. When you change this to 'Only these readers,' you'll get an Add Readers button.
    2. Click the Add Readers button and then enter the email address of a person to whom you'd like to grant access to your blog. To add multiple people, separate their addresses with commas.
    3. For each address entered, the Google Account associated with that address will be given access to view your blog. If an address is not associated with an account, that person will receive an invitation email with a link allowing them do one of three things: